Windows has always had the abitlity to share files and printers with other Windows PCs, and Macs. But did you know that you can have a web server as well? You can if you Windows PC is Windows XP Professional, Windows 7 Professional, or Windows 8 Pro. Let get right to installing the web server in Winodws 7.
First, go to the control panel and find programs and features.
Click Turn on Windows features on or off.
Select Internet Information Servicies, and click ok.
Once installed you can test the installation by typing the following on the search line. http://localhost
If installed correctly you should get the IIS (Internet Information Services) Logo.
Now all you have to do is create content and drop it in the folder: C:InetPubwwwroot. If you have Microsoft Word create a document and save it your My Documents Folder.
Be sure to select “Web Page” from the Save as Type drop down menu. and use index as your file name. Click save.
Copy the index.htm file and the index folder from my docuemnts to c:inetpubwwwroot. Acknowledge the security warning, you may need to provide administrative credentials. Now test by typing the following on the search line
The copied page display from your web server
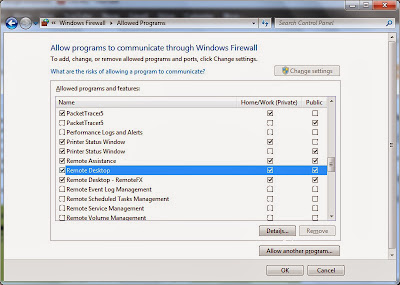
As you can see it is easy to install and use the Windows Web server. If you want to share this content with your workgroup just have your workgroup computers connect to your computer using your computers name or IP address from their search line. First allow the web server through your firewall. Click allow a program or service through the firewall.
Click change setting, scroll to the bottom and select web server checkboxes as shown, then click OK.
Now type URL for the computer serving the web page from another computer in the workgroup. Example:
http://172.16.0.5
The page is delivered to this workstation from the web server.
Pretty cool huhh! This is quick and easy way to publish information to your workgroup from your computer without having to involve IT, or get pay for hosting.
