Adding and configurring the DHCP Server Role on Windows Server 2012R2

FacebooktwitterlinkedinmailFacebooktwitterlinkedinmail

The DHCP Server role is probably the most important part of the network infrastructure. It is the reason you are able to quickly get to resources on your local area network, and the internet. Besides assigning each computer, or mobile device a unique number called an IP address, it tells each of those devices where to go to find other servers, or services necessary for a network to function. To acomplish this you must program the DHCP server service with IP address for every host on the network, as well as information about the DNS server for name resolution, and gateway device, that lets devices get out to the internet. To install and configure DHCP follow these steps:

  1. Log on to your server as administrator
  2. Allow the Server Manager to load
  3. From the Server Manager click Add roles and features
  4. If prompted with the Before your begin screen click next.
  5. On the Select Installation type ensure Role-based or feature-based installation is selected, and click next
  6. On the Select destination server, click the server that you want to install DHCP on the click next. In our example there is only one server which is highlighted (DC1.contoso.com)
  7. From the Select server roles page check the box for DHCP server. Click the Add features button to continue, then click next to go on to the next page.
  8. On the Select features page click Next to continue
  9. On the DHCP Server page click Next to continue
  10. On the Confirm installation selections page click Install to continue
  11. The Installation page display the installation progress. Once the Installation progress page reports: Configuration required. Installation succeeded on your computer, click close
  12. On the Server Manager click the notification flag with yellow triangle.
  13. From the resulting menu select Complete DHCP configuration
  14. On the resulting Description page click Next to continue
  15. On the Authorization page, Use the following credentials should be selected with an administrative account. In our example we started the procedure with CONTOSOAdministrator. Click commit to continue, then click close
  16. Now go to the Server Manager and from the tools menu select DHCP
  17. On the DHCP console all nodes until you see the contents of the IPV4 node
  18. Right mouse click on the IPv4 node and select New Scope from the context menu.
  19. Click Next on the Welcome screen to continue
  20. On the scope name type Scope 1, although this could have any name, like subnet1, subnet2, or subnet3. Scope one will do for this example. Click Next to continue
  21. On the IP address range type the starting IP address of the range IP addresses you intend to assign, for this example we’ll use 192.168.0.1, then type the last IP address you intend to assign. In this example we’ll use the last assignable address in this class of IP: 192.168.0.254. Click Next to continue
  22. On the exclusion range we’ll enter the IP address: 192.168.0.200 and click Add . This prevents the DHCP server from assigning this IP address to another host, thus avoiding an IP address conflict. You could at this point add additional host IP addresses that have already been configured on other hosts such as printers or routers. For this example we’ll assume this is the only host of the range that has been assigned. Click Next to continue
  23. On the lease duration you can configure how many days, hours, or minutes an IP address is good for. The default value is good for this example. Click Next continue
  24. On the Configure DHCP Options, click Yes, I want to configure these options now, then click Next to continue
  25. On the Router(Default Gateway) page we’ll use this computers IP address, on the assumption that this computer will be the gateway for other computers to get to the Internet. In reality, the IP address pertains to a device such as Cisco router that sits between you LAN, and the Internet. Click Next to continue
  26. On the Domain Name and DNS Search page, values should be pre-populated as this machine has already been configured as a Domain Controller, and as such would know these values. Accept them and click Next to continue.
  27. On the WINS server page click Next to continue.
  28. On the Activate Scope page, click Yes, and click Next to continue
  29. On the Completing the New Scope Wizard page, click Finish to finish the DHCP configuration process.
  30. Your DHCP server is now configured and serving IP addresses.

Installing Active Directory Services on your Windows Server 2012R2

FacebooktwitterlinkedinmailFacebooktwitterlinkedinmail

In this post, I demonstrate how to install Active Directory Domain Services on a freshly installed Windows Server 2012R2 Server. If you missed the previous video, you can watch it at the following link:  Windows Server 2012 Prelimary configuration steps. Watch this video to prepare a Windows Server to be pre-configured for installation as a Domain Controller.
After the preliminary steps for the server have been done. Follow these steps:

  • Log on to the server as administrator
  • Wait for Server Manager to load. 
  • From the Server Manager Dashboard click number 2 Add Roles and Features
  • On the Before you begin screen click Next
  • On the select Installation type ensure that Roles-based or Features-based Installation is selected and click next
  • On the select Destination Server screen ensure that your target server name is highlighted. In our example that is DC1, then click next.
  • From the select server roles list select Active Directory Domain Services.
  • On the Add Roles and Features Wizard pop-up box select Add Features
  • On the Select Server roles screen, click next
  • On the Select Features screen, click next.
  • On the Active Directory Domain Services screen, click next
  • On the Confirm installation selections screen, check the box to Restart the destination server automatically if required, and click Yes on pop up dialog box.
  • The installation starts. You can monitor progress on blue bar that is going across.
  • When the progress bar reaches the end on the Installation Progress screen, notice just beneath the bar, the message that Configuration required, Installation succeded on DC1.
  • Click on close for the screen, and move your mouse to the top of the Server Manager screen, then click on white flag with the yellow triangle and exclamation point in it. This reveals a menu items that still need to be performed for the installation to be complete. From the resulting menu select the blue link Promote this server to a domain controller, a screen called Deployment Configuration is presented with three options.
  • Select Add a new forest, then under Specify the domain information for this operation, type your domain name, in this instance where are using Contoso.com, then click next.
  • On the Domain Controller Options screen type the Directory Services Restore Mode password, and confirm, then click next.
  • On the DNS Options screen, click next
  • On the Additional Options screen, wait for the NetBIOS doamin name to be populated. It should say CONTOSO. Click next to go the next screen.
  • On the Paths screen, leave defaults, and click next.
  • On Review Options, review your selections, and click next.
  • Wait for the Prerequisites Check screen to finish populating. then click the Install button to continue
  • The Installation screen displays progress on your installation. Wait for it to finish.
  • You’ll get a banner indicating the computer is about to restart.
  • The computer restarts
  • Log on to your domain controller, and verify that Active Directory and DNS where installed correctly.
  • Wait for Server Manager to load.
  • Notice the additional items listed on the left column. One for ADDS Active Directory Domain Service, and another DNS for Domain Name Service.
  • Click ont the tools menu in Server Manager. Note the addition of five new entries for Active Directory
  • Click the DNS on the tools menu. 
  • On the DNS manager expand DC1, then expand forward lookup, then Contoso.com
  • Click on the contoso.com object and notice the DC1 server in the list of records
  • Close the DNS Manager
  • From the tools menu on Server Manager select Active Directory Users and Computers.
  • On the Active Directory Users and Computers console, expand contoso.com, then click on the Domain Controllers object in the left column. Notice DC1 in the Domain Controllers object.
  • Close the Active Directory Users and Computers Console.
  • We have succesfully installed and verified a doman contoller in the contoso.com domain.

Windows Server 2012 Prelimary configuration steps

FacebooktwitterlinkedinmailFacebooktwitterlinkedinmail

Once a Windows Server is installed, there some basic changes that need to be done before configuring it for ulitmate duty. These are:

  1. Configure a static IP address. Servers don’t usually receive their IP address dynamically like other workstations like Window XP, Vista, 7, or 8.
  2. Configure the time zone. Necessary for time sensitive tasks. Configure the time zone first, then correct the date and time if necessary.
  3. Enable remote desktop. In all likelyhood once you configure the server, you will not touch it physically anymore. With Remote Desktop Enabled, and the IP address of the server you can remotly connect and do whatever you need from your Windows workstation Remote Desktop Connection client.
  4. Finally the last thing to do is change to computer name to something more intuitive than WIN-XXXXXXX. Once this is done you can connect to it in the Windows explorer or Remote Desktop client with the simple computer name such as DC1, or SQL1
Stay tuned for the next video whree we take this server and make it a domain controller.

Connecting Fedora13 to Windows using “Samba”

FacebooktwitterlinkedinmailFacebooktwitterlinkedinmail

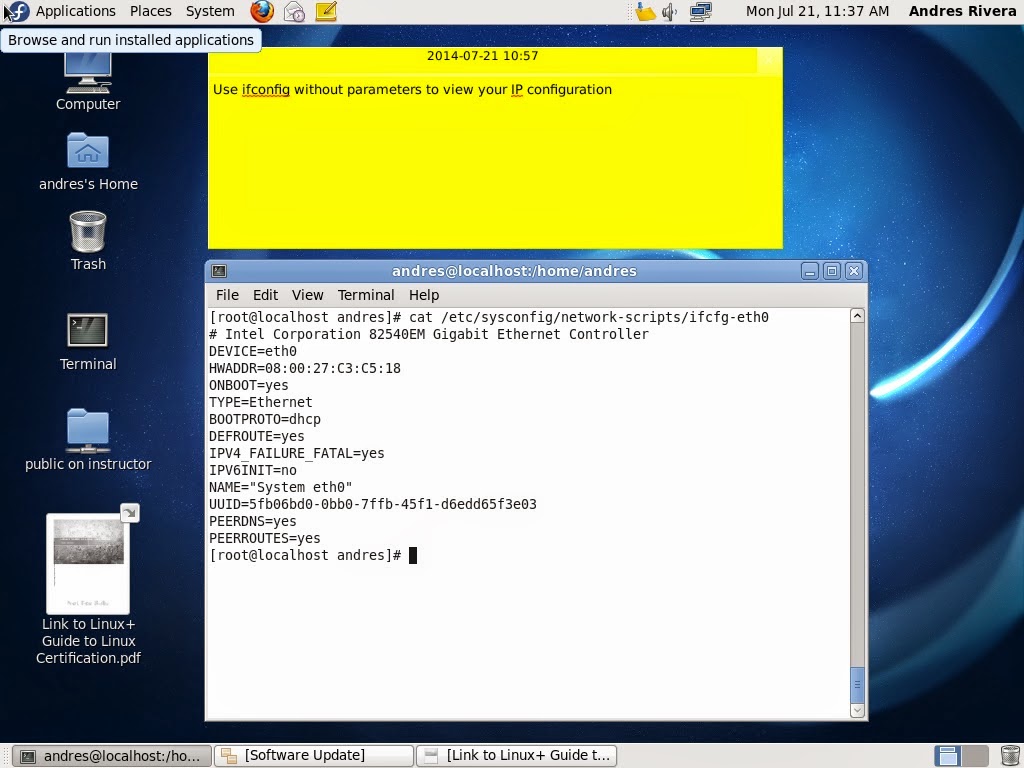
When using Fedora13, you will probably want to connect and use resources from Windows computers. To do this you will need enable Samba, a utility that makes Linux use  SMB’s (Server Message Blocks) the protocol Windows uses to comunicate with other Windows computers. Most modern Linux distros have this functionality built-in, but in early editions of Fedora13 it does not. Here how to enable it:

  • Log in to your Fedora13 machine
  • From the Applications Menu select System Tools, then select Terminal
  • In the Terminal session type: su to elevate you to super user. 
  • Provide to Super user password.
  • From the new prompt type: yum install samba
  • Allow the program to download and install. If prompted to install additional software type y, and press Enter.
  • Once the installation is finished and you are returned to the command prompt, goto the System Menu, and select Administration, then select services.
  • On the services console locate and enable smb. Once enabled close the services console.
  • From the System menu, select Administration, then select Firewall. Provide root credentials when prompted.
  • From the firewall console locate and click the check boxes for Samba, and Samba Client. Click Apply on the menu bar to enable. Close the Firewall console.
  • To test the networks functionality goto Places menu and select Network.
  • Right mouse click Windows Networks and select open from the context menu.
  • You should see a series of computers or workgroups.

Installing XRDP Server on Linux Fedora 13

FacebooktwitterlinkedinmailFacebooktwitterlinkedinmail
   

  • Log in to your Linux machine. 
  • From the Applications menu, select “System Tools”, then select Terminal
  • On the terminal screen type: “su”, then provide your root password
  • Now on the command prompt type: yum install xrdp
  • Allow the software to download and install. If prompted to install additional software, type “y” to proceed. Allow them software to finish downloading and install software. Leave the terminal window open.
  • After the software installs go to the “System” dropdown menu and select “Administration”, then select “Services” from the submenu.
  • On the services console locate and highlight the xrdp service. Click the enable button on the toolbar. Once the color changes to green exit the services console.
  • From the System dropdown menu select “Administration”, then select, Firewall from the submenu.
  • Click “close” on the configuration popup. Provide root password on the Authenticate Popup.
  • On the left column locate and highlight “Other ports” on the Firewall console.
  • Click “Add” on the right side of the Firewall console 
  • From the Port and Protocol dialog box, locate, highlight, and doubleclick port 3389 tcp. The click Add again, and locate, highlight, and doubleclick 3389 udp. Once added, click Apply on the menubar.then exit the Firewall console.
  • Go back to the open terminal window used previously to install xrdp. 
  • Type reboot on the terminal window. Allow the computer to reboot.
  • Log back into your computer.
  • From the Applications menu select “System Tools”, then “Terminal”
  • On the terminal windows type: ifconfig and press Enter. Your IP address will show for the eth0 adapter. This the number you must use to connect to the XRDP server on your linux box from your Windows workstation.
  • Now go to a Windows computer and locate Remote Desktop Connection program.
  • Type the IP address obtained from the Linux computer. 
  • Provide user credentials and viola!

I love LinuxMint

FacebooktwitterlinkedinmailFacebooktwitterlinkedinmail

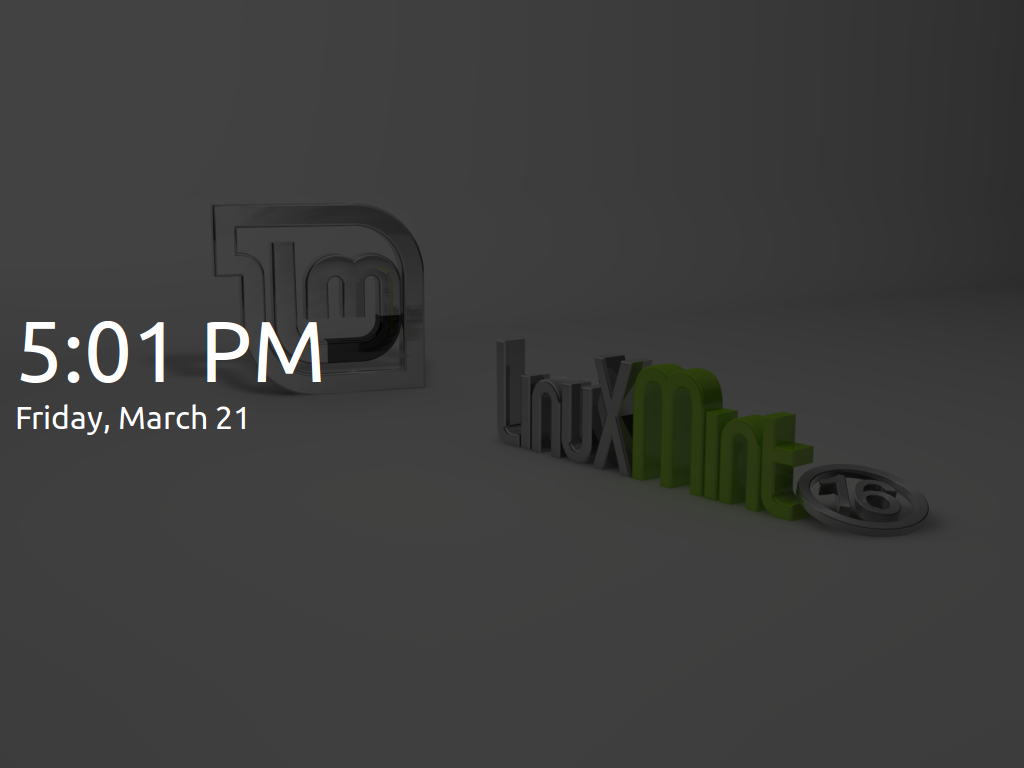
This weekend I got to try the Linux distro LinuxMint16. Normally I don’t like using Linux in general because at some point I hit a wall where I want to do something that is easy to do in Windows, and that’s when I go running back to Windows. This time however I was pleasantly surprised with LinuxMint16.

Unlike most of the other distros that conform to the OSS GPL license, LinuxMint comes with embedded drivers, codecs, and applications that let you use most of your media and documents that you already use in Windows. The only thing I ran into was Netflix not supporting Linux directly because of Silverlight. There is a third party tool however that you can use. Details are on this article link.

LinuxMint16

Otherwise I was able to hear my music, see my movies, and use nearly all my Microsoft Office documents, and Adobe PDF’s. You’ll still need Windows to run Windows Apps. In addition to having all this support, it is very light, and the full download is only 1.1G. If the developers continue this good work, I might switch. Sorry Microsoft.

Create a logon banner for Windows

FacebooktwitterlinkedinmailFacebooktwitterlinkedinmail

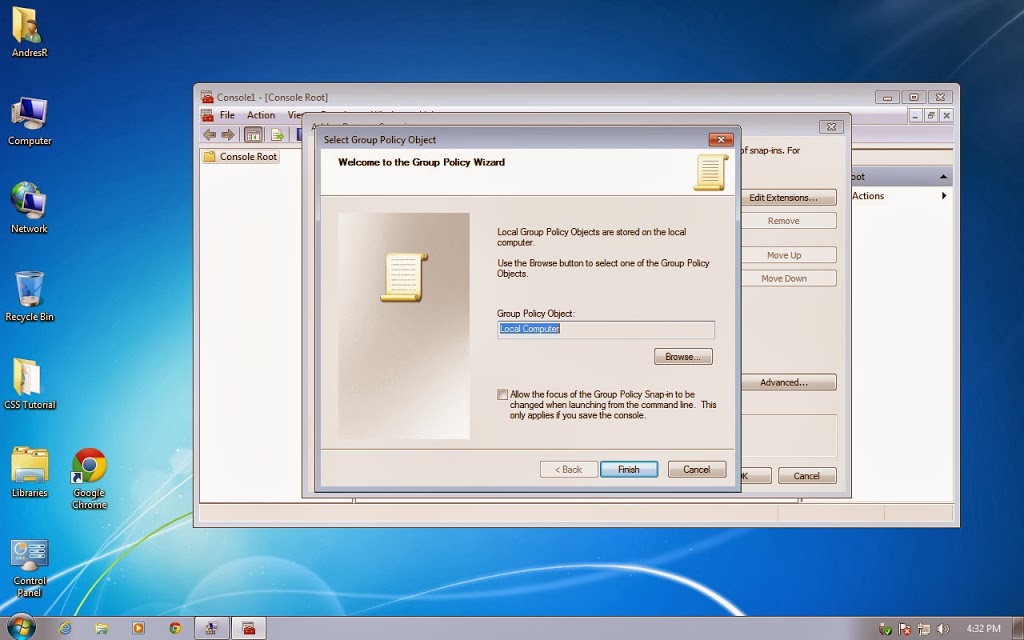
You can use the local group policy object in Windows to create a banner at logon. First open an MMC from the search line.

Select file, then Add/Remove Snap in

Select Group Policy object from the list of snap ins. then click add.

Accept local machine and click finish. Then click OK

Expand local computer policy, computer configuration, Windows Settings, Security settings, Local policies, Security options. On the right pane scroll down to locate: Interactive logon: Message text for users attempting to log on, and Interactive logon: Message title for users attempting to log on. Add your message and title, then click ok.

Close console1 and save as Loca computer policey when prompted

Now. Log off and log back on

Disk Mirroring with Windows 7 Pro

FacebooktwitterlinkedinmailFacebooktwitterlinkedinmail

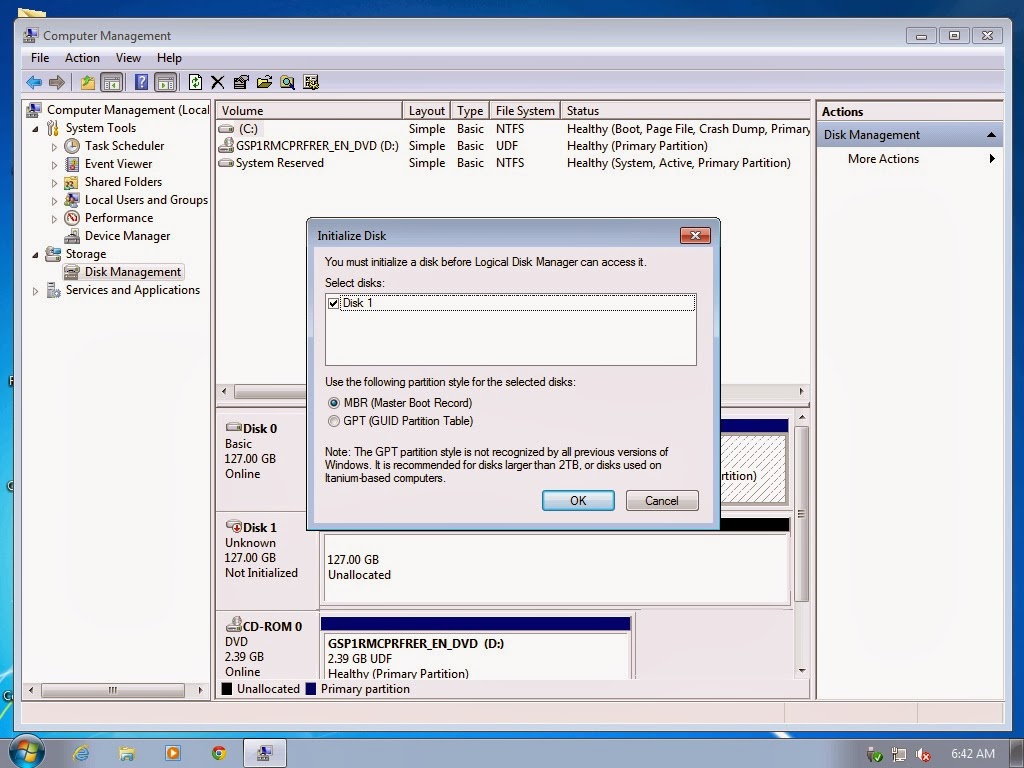
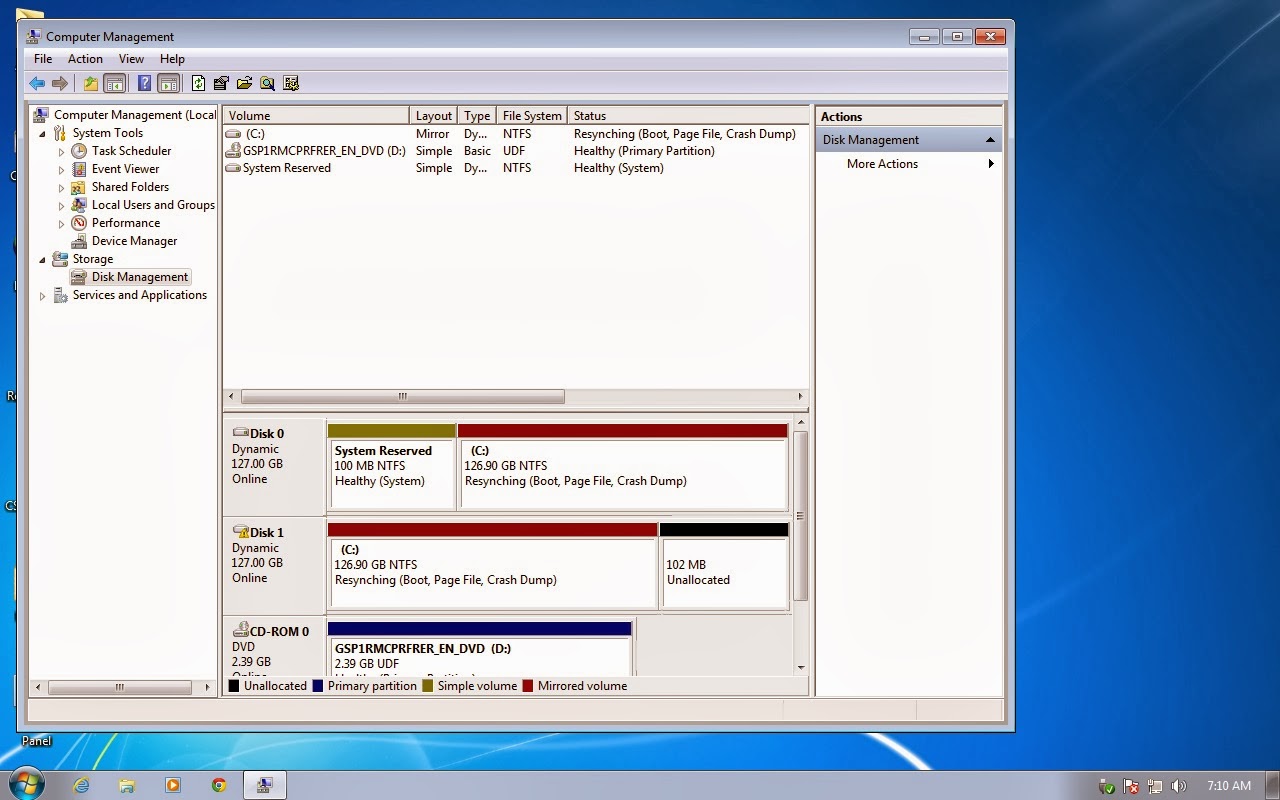
Mirroring is a technology known as RAID1 (Redundant array of Inexpensive Disks). This technology allows to have a fault tolerant disk  in the event of a hardware failure of you main hard drive. The idea goes like this. You have two hard drives of relative equal size and preferably same make and model. Then you mirror the first disk to the second disk. Everything that is written to the first disk is written to the second disk. Should the first disk experience a hardware failure or fault. The second disk continues to operate, so you can continue to work without interruption. At  you earliest convenience you can replace the failed disk, and restore the mirror. Lets see how this is done

First add a disk of the same size as the one you have in your computer. Typically this will be a new sata disk. Connect the sata disk two one of the remaining sata port on the motherboard. Turn on the computer and go to the computer management console. Then select disk management.
The Initialize disk dialog box will show a new drive has been added to Windows. Click ok to initialize disk
You now have two disks. One with Windows, and one unallocated.
Right mouse click the disk that currently has Windows, this will usually be the C: drive. Then select from the context menu, Add mirror

Select the disk, and click add mirror button. Click Yes on the warning
Windows starts synching the disks.

Make your computer wake you up using Windows scheduler

FacebooktwitterlinkedinmailFacebooktwitterlinkedinmail

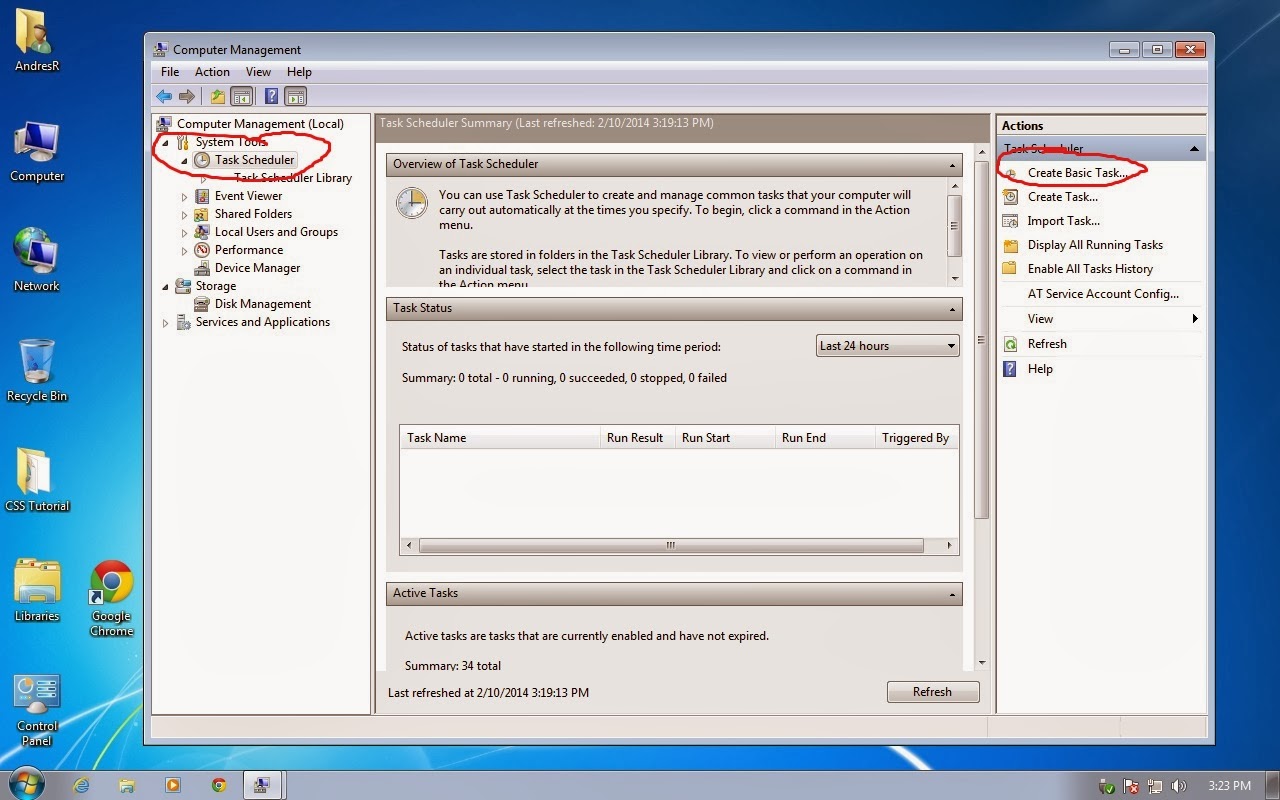
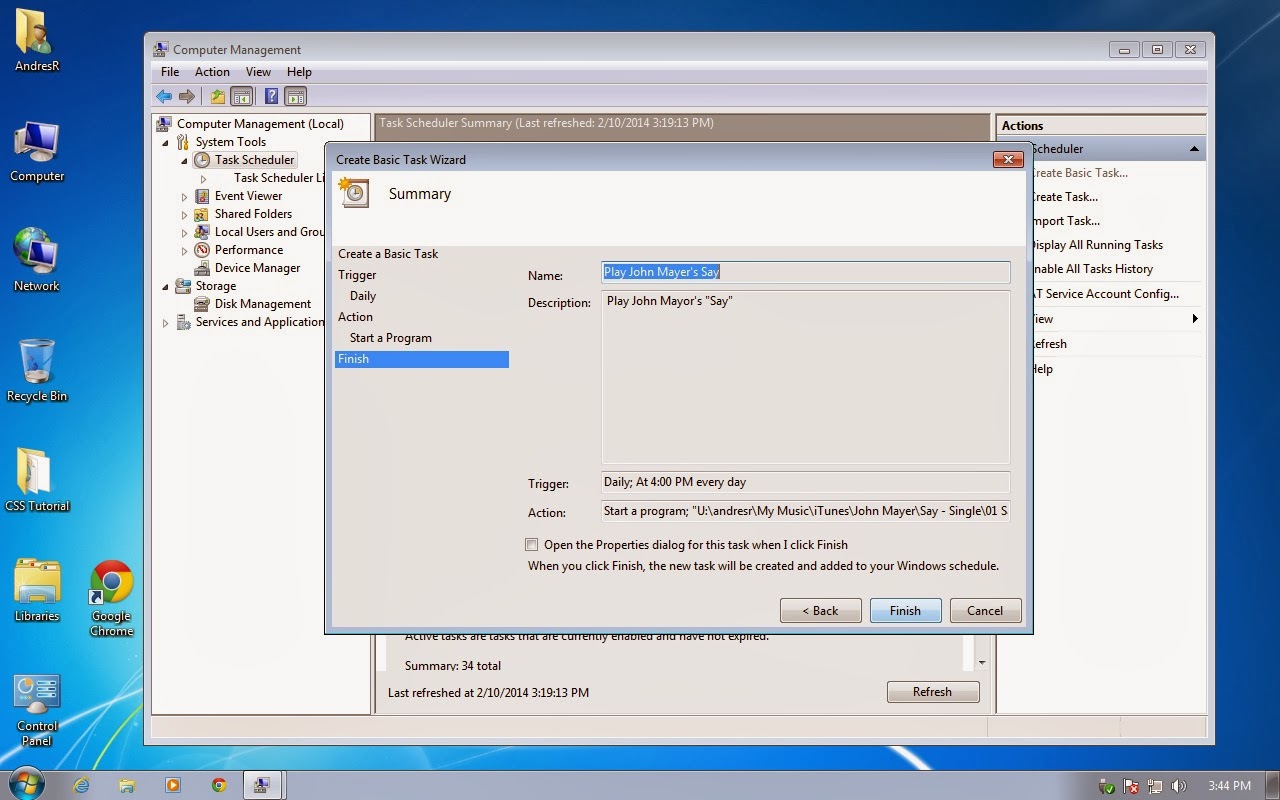
No gadget, no app, just use the Windows built-in task scheduler to make your favorite Media Player wake or remind you. Use to be I would use the task scheduler to schedule backups, and maintenance routines. But one day I got creative. If the scheduler could start any program in Windows, could it launch a program based on file type as well. So I ran this experiment. I scheduled an mp3 file to start at 6AM every day. I sure wake me. And because there is no snooze button, I had to leap out of bed to get to the volume control.

This is how you do it:
Right click computer and select manage
On the Computer Management console select the task scheduler, and choose Create Basic Task

Create name and description of task, then click next.
Select frequency and click next
Set start date and time, and select recurrence frequency, then click next
Select start a program and click next
Enter the full path and file name of the audio file to play, then click next
On the summary page click finish
I set the scheduler for today at 4PM, so let see if it fires at 4PM.
The scheduler is configured to play Say every day, at 4pm.